
The essentials in 1 minute
- Behind the hob several materials stand up to the heat, but only three are seamless: toughened glass, ceramic or sintered stone, and HPL kept clear of the pan.
- Tiles stand up to the heat too, but bring many joints that take on grease and water vapour.
- Acrylic glass and foil are the wrong choice behind the hob: they warp or melt.
- The seamless solution is a splashback from the same slab as the worktop, with only a silicone joint.
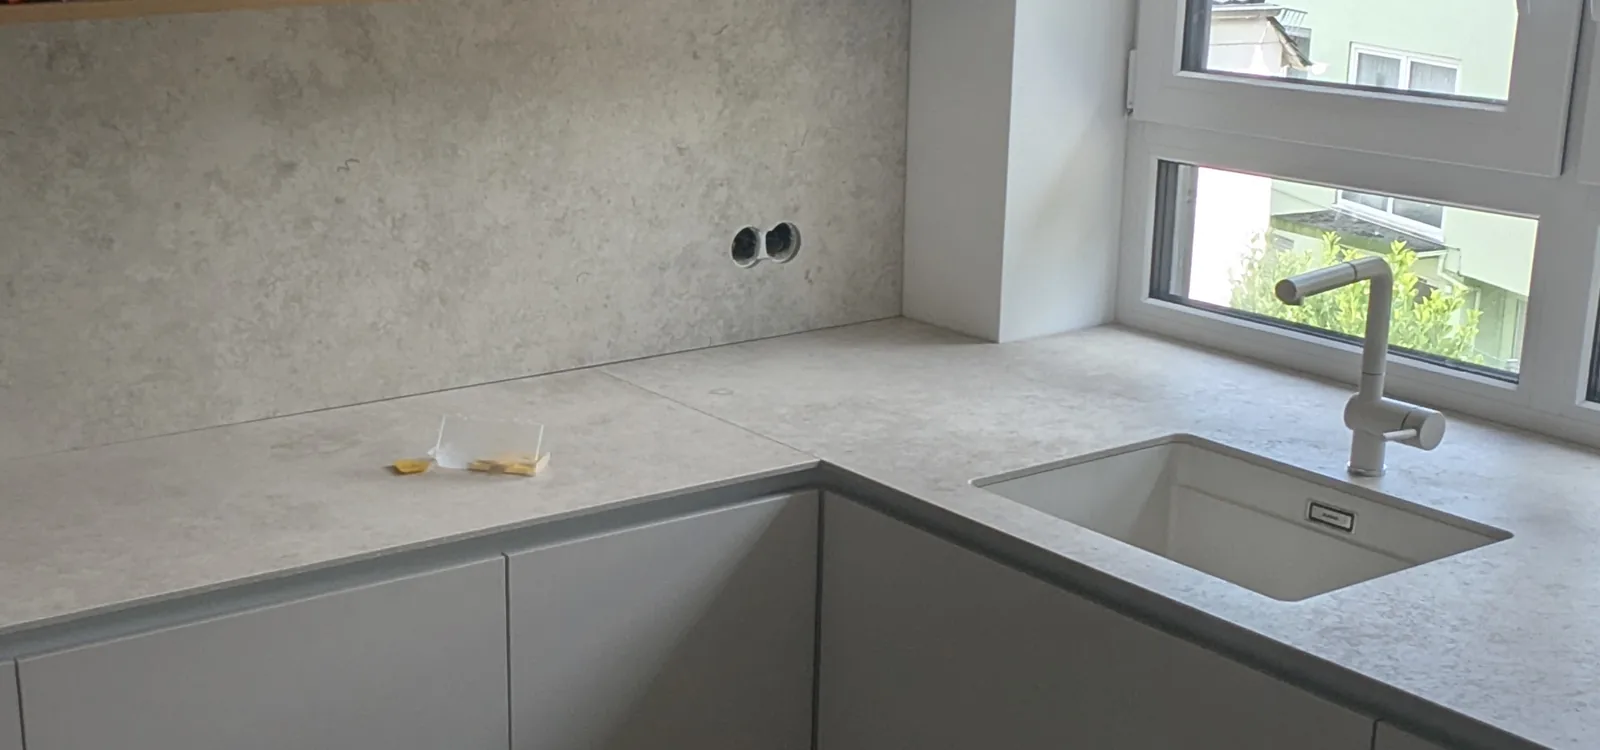
- The 68 mm socket cut-outs come from the electrical plan and are fixed before the slab is cut.
 Rusi KolevArchitect & Founder
Real Estate Economist (ebs)
Questions in this guide 12

What a splashback is
A splashback is the wall surface between the worktop and the wall units or cooker hood, the strip behind hob and sink, usually 56 to 60 cm high, depending on your height and what the hob manufacturer specifies. It has two jobs: it protects the wall from grease, water and heat, and it closes the open joint between slab and wall. The material question decides three things at once that hang together in everyday use: how much heat the surface directly behind the hob takes, how many joints it has, and how the sockets get into it. The following table sets the five common materials against each other on that basis.
| Material | Heat resistance | Joints | Cleaning | Socket cut-out | Price index (guide, tiles = +) |
|---|---|---|---|---|---|
| Toughened glass (back-painted) | high, suitable behind the hob | seamless, only a silicone joint to the slab | smooth, very easy | at the factory (68 mm), not drillable afterwards | ++ to +++ |
| Ceramic / slab from the worktop (Dekton, Neolith, Laminam) | high, pot and pan straight on | seamless, from one slab | non-porous, very easy | in the workshop drawing, before cutting | costed with the slab |
| HPL / compact laminate (Fundermax) | ~180°C briefly, a trivet for a glowing pan | seamless, solid core | easy to clean, moisture-insensitive | cut out in the workshop drawing | + |
| Tiles | high | many joints, a cleaning issue | surface easy, grout joints laborious | socket sits in a tile or a joint | + |
| Acrylic glass / foil | low, warps or melts | seamless | smooth, but scratch-sensitive | afterwards, with care | low, not durable |
Behind the hob: which kitchen splashback is heat-resistant
A heat-resistant kitchen splashback behind the hob is toughened glass, ceramic, HPL or tile. The wrong choice is acrylic and foil. Toughened glass is single-pane safety glass, back-painted in any colour, smooth and seamless. The socket cut-outs are made at the factory, because tempered glass cannot be drilled afterwards. Ceramic or sintered stone, sold as Dekton, Neolith or Laminam, takes the heat in everyday use, so that a pot and a pan directly against the wall are no problem. The often-quoted 1,200°C is the sintering temperature from manufacture, not the everyday figure. HPL as compact laminate from Fundermax takes about 180°C briefly: a boiling pot is no problem, a glowing pan straight off the hob needs clearance. Tiles are robust and heatproof. Their issue is the joints, which take on grease and water vapour behind the hob and become a cleaning task. And to be honest about the two that are often pushed for the splashback at the DIY store: acrylic glass and self-adhesive foils do not stand up to the sustained heat behind the hob, they warp, blister or melt. For the cold run they may do, but behind the hob they are the wrong choice.
The seamless solution: the splashback from the worktop
The seamless splashback comes from the same slab as the worktop, in ceramic from Dekton, Neolith or Laminam or as compact laminate from Fundermax. The advantage is a single surface with no continuous joints: between worktop and splashback only a narrow silicone joint remains. Otherwise there is no seam in which grease and limescale collect. The material is the same as on the slab, so non-porous with ceramic and moisture-insensitive with the compact laminate, and it is wiped with the same cloth. How the slab itself is planned and made is in the guide to the ceramic worktop. Choose tiles and you get many small joints. Choose glass and you get one large seamless surface with a silicone joint at the bottom. Choose the slab and you get the calmest look, because work surface and splashback appear as one material.
Not every splashback has to be from the same stone as the slab. If the worktop already has a strong grain or colour, the same look running vertically behind the hob quickly becomes too much over the years. We then often advise a calm, pale splashback, frequently a thin compact laminate in a slightly broken white such as RAL 9010: seamless, easy to clean and without adding a second dominant surface to the room. Such a finish can later be reordered to match exactly, as long as the finish is available.
Sockets: from the electrical plan, before fabrication
Sockets in a splashback of glass or ceramic need 68 mm cut-outs that have to be fixed before cutting. Toughened glass cannot be drilled at all once tempered, ceramic only with a diamond tool and best before fitting. That is why every socket belongs in the workshop drawing before the slab is cut in the Manufaktur, our own production facility. The positions do not come from a gut feeling but from the electrical plan, which is drawn up early in the planning: the lower edge of the sockets 10 to 15 cm above the slab, the strip directly behind the hob kept clear, the groups where the coffee machine and the blender stand. In tiles or an HPL slab the electrician can, at a pinch, set a socket later too, but in glass and ceramic the order is a must, not a convenience.
What that costs
A splashback costs very differently depending on the material, from tiles and the HPL slab at the lower end, through toughened glass in the middle, to the slab from the worktop material at the top. As a rough guide, a price index with tiles as the reference (tiles = +): HPL is close to it, back-painted toughened glass well above it, and the stone slab is a special case, because it is costed with the worktop. A splashback in 4 to 6 mm compact laminate costs around €300 to €600 incl. VAT with us for a typical niche, fully fitted, depending on the price class. The splashback from the same slab is planned with the worktop and made from the same material. The splashback area is added to the slab position depending on the length of the splashback. The worktop itself is, at Kolev, around €3,000 to €7,500 incl. VAT in ceramic or around €1,500 to €1,900 incl. VAT as compact laminate, which we deliver and fit; ceramic and natural stone run through our stone partner without our own markup. A kitchen at Kolev starts at €14,999 incl. VAT, including planning, delivery and installation, but the slab, and with it the splashback, is added as a separate line item. For ceramic, the free cost calculator works out both. What a whole kitchen with everything costs is in the overview of the cost of an architect-designed kitchen (Architektenküche).
How we do it at Kolev
At Kolev the splashback comes from the same slab as the worktop, with the 68 mm socket cut-outs in the workshop drawing and a routed-in 24 V LED light baffle that arrives pre-wired from the Manufaktur. The cut-outs are drawn from the 3D site survey and fixed before cutting, so that no socket has to be drilled afterwards. The light is part of the workshop drawing, not of the accessories. How the light baffle is routed in and pre-wired is in the guide to kitchen lighting. The preparation for power is in the electrical plan, the connection to the mains is done by your qualified electrician. The slab is delivered and fitted by our stone partner on our behalf. The warranty under the statutory provisions stays with us. The renovation in Frankfurt shows how this looks in a real floor plan.
Frequently asked questions
Which kitchen splashback is heat-resistant behind the hob?
Toughened glass, ceramic and HPL. Ceramic from Dekton, Neolith or Laminam takes the heat in everyday use and allows a hot pot directly. Toughened glass is back-painted safety glass. HPL as compact laminate takes about 180°C briefly. Acrylic glass and self-adhesive foil do not stand up to the heat behind the hob for long.
Can the splashback be from the worktop?
Yes, and that is the seamless solution. The splashback is made from the same slab as the worktop, in ceramic or as compact laminate, so that work surface and wall appear as one material and only a silicone joint remains between them. It is planned with the worktop and is added to the slab position depending on the length of the splashback.
How do the sockets get into a glass or ceramic splashback?
With 68 mm cut-outs that are fixed in the workshop drawing before cutting. Tempered toughened glass cannot be drilled at all, ceramic only with a diamond tool. That is why the positions come from the electrical plan, with the lower edge 10 to 15 cm above the slab. In tiles or HPL a later socket is possible at a pinch.
Is acrylic glass a good kitchen splashback?
Not behind the hob. Acrylic glass copes poorly with the sustained heat above the hob, it can warp, buckle or melt. The same applies to self-adhesive foils. On the cold run, away from the hob, they are less critical, but toughened glass is the more durable choice there for a little more.
Tiles or slab for the kitchen splashback?
Tiles are heatproof and often the simpler choice over the area, but have many joints that take on grease and vapour behind the hob. A splashback from the worktop or from toughened glass is seamless and wiped with a cloth. It pays off above all when the worktop is in ceramic or stone anyway.
Next step: the first consultation
If you would like to know whether a seamless splashback from the slab or a tiled splashback suits your kitchen and your budget, then let’s talk. In the first consultation we look at your floor plan, your wishes and your budget, directly with the architect, 45 to 60 minutes, for Frankfurt and the Rhine-Main region.
And a piece of advice no kitchen studio likes to give: get three offers and compare them. We are one of them.