KOLEV ARCHITEKTENKÜCHEN
Frankfurt renovation.
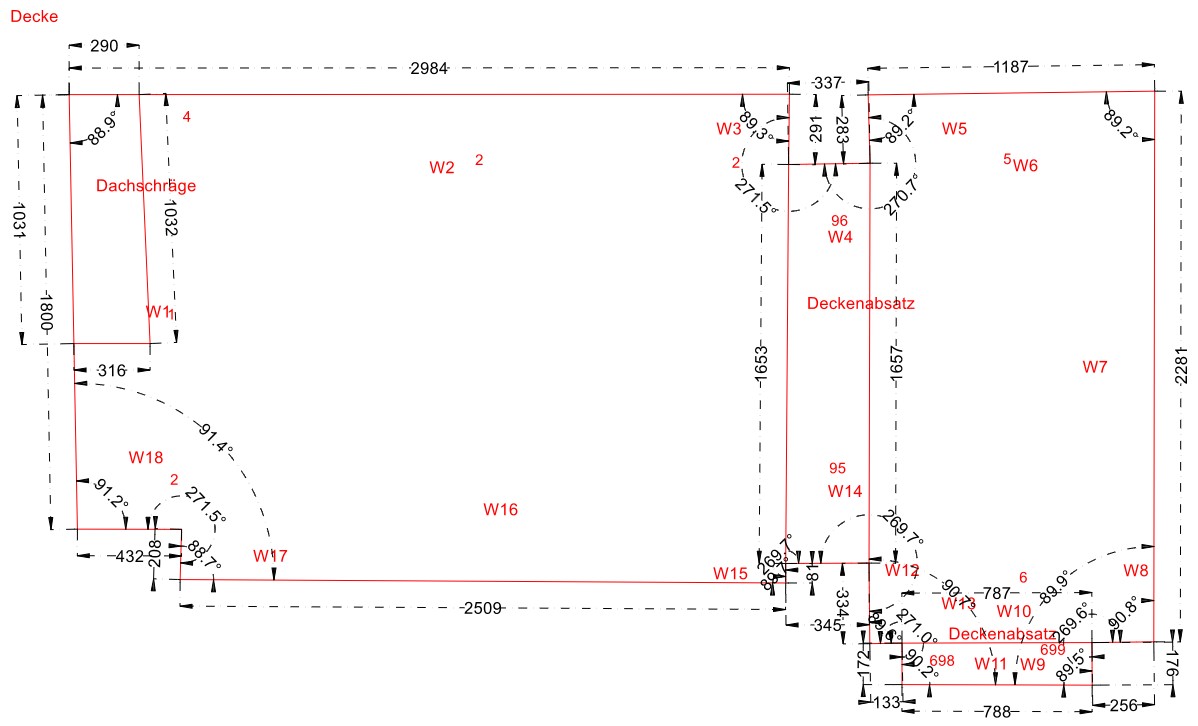
Three wall constraints.
One continuous line.
Brief
Single-family home, renovation in existing building, three people cooking together.
The Schäfer family wanted warm tones, a quiet, continuous space, handle-free fronts — and an island three people could cook at. What the room imposed in return:
What industrially-planned modular kitchens produce here: filler panels, cover strips, visible jumps at every fold. Multiplied across three folds, this becomes a kitchen that sits in front of the room — not inside it.
Measurement · 3D
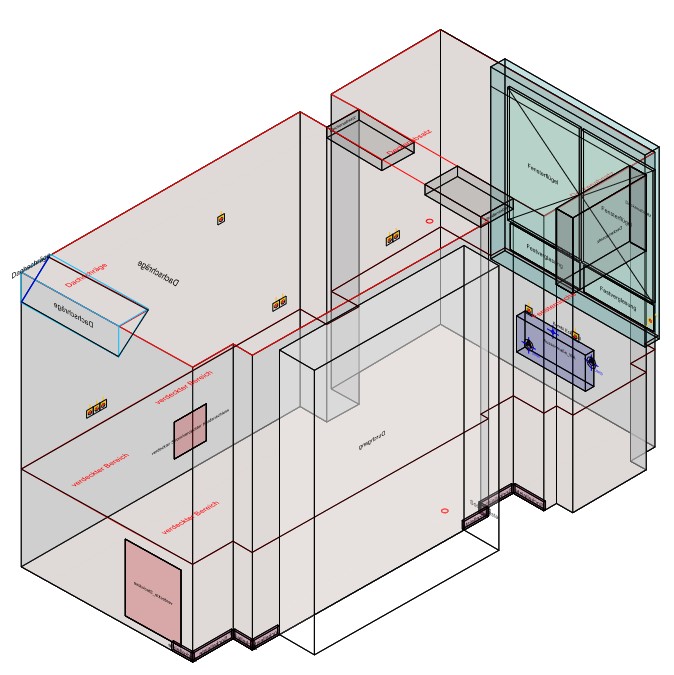
Three dimensions, all wall angles, all folds — before the first cabinet is drawn.
From this measurement no module order sheet is produced. A cut list goes to the CNC mill: every cabinet side, every shelf, every front individually, in the actual dimensions of this room. A 9 cm-deep, 166 cm-long beam is not a tolerance to be hidden behind a filler — it is a measurement to which the tall-cabinet top edge precisely couples.
The difference doesn't begin during installation. It begins on the day the file goes to the mill.
Solution
Birch grey matt · smoked walnut accents · handle-free vertical and horizontal channel grooves in the front material.
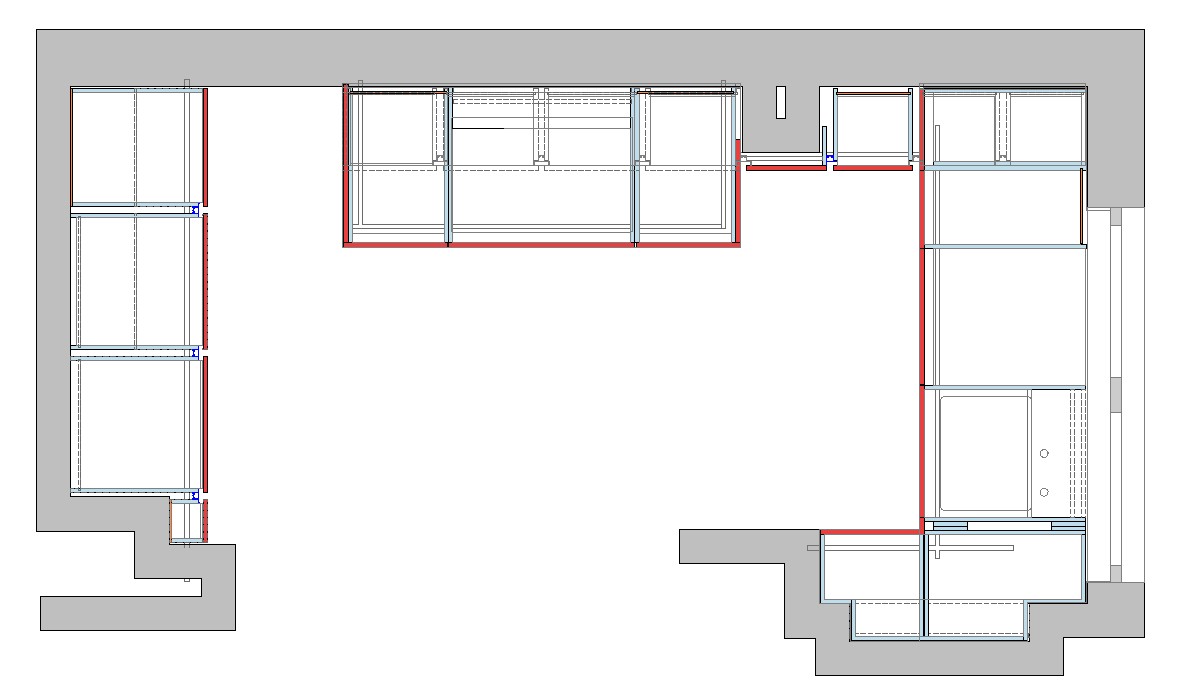
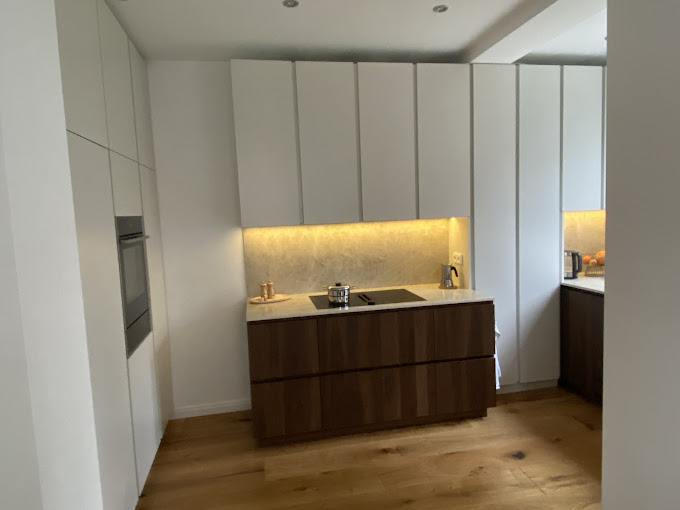
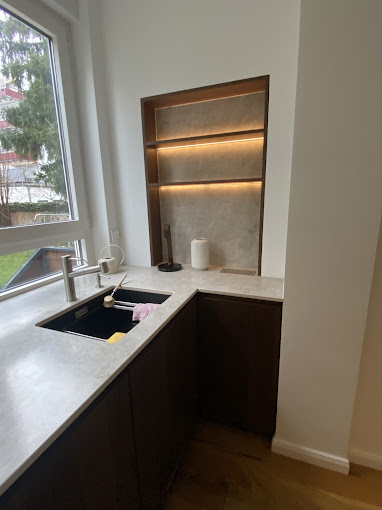
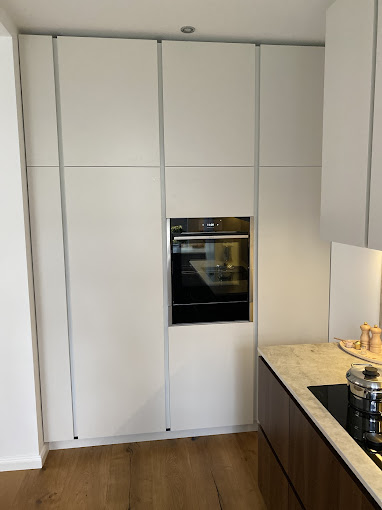
The tall-cabinet line sits with its top edge exactly 9 cm below the ceiling — flush with the beam. Two tall-cabinet panels stand side by side in the same plane: one conceals a column, the other is a fully usable cabinet. The wall cabinets join in, the whole produces one continuous birch-grey façade. Island and sink step forward as a smoked-walnut accent — no jump, no filler. From a viewing angle the eye doesn't notice the ceiling beam until the second look.
The appliance wall is given vertical channel grooves in the front material, which serve as the handle-free opening. Three tasks are solved in exactly one front plane: on the right the stair pitch disappears behind the tall pull-out larder cabinet, on the left a narrow cabinet conceals another column, and between them sit the refrigerator, steam oven and warming drawer with built-in freezer below — all flush in the line.
Instead of a dead-end cabinet with fitting panels: the 78.8 × 17.6 cm niche becomes an open shelf wall. Indirect LED lighting back-lights a ceramic rear panel. Every millimetre of depth visibly used — no volume wasted, no filler concealing.
Underneath the shelves, a T-shaped base cabinet — set into the floor plan like a Tetris piece. A drawer on the front; T-shaped insert shelves underneath, claiming the otherwise dead space behind the adjoining wall. A T-corpus, a drawer, and T-shaped insert shelves in one element — not available as a module.
The appliances the family wanted, without compromise to the line: downdraft (on the island, no extractor over head height), steam oven, warming drawer — all flush in the line, no step, no filler.
Result
Customer photos, Frankfurt, around 12 weeks after installation.
We deliberately don't name the district here. The three photos on this page were taken by the Schäfers themselves and shared with their Google review — anyone interested can find them under the reviews for Kolev Architektenküchen.
The questions you should ask every kitchen supplier in the initial consultation are in the guide The Five Most Expensive Mistakes When Buying a Kitchen. Which brand-name appliances (BORA, Quooker, Miele) are installed at which architect's conditions can be found in the appliance catalogue.
Frequently asked questions
Premium architect-designed kitchens start at €14,999. The Schäfer renovation shown here came to €37,000 including all appliances (BORA downdraft hob, Quooker, steam oven, warming drawer), ceramic worktop and installation. The architect's planning work worth €5,000 is included in your first offer. The total depends on room size, front material and appliance package — you receive an honest assessment in the free initial consultation.
Every plan begins with millimetre-precise 3D measurement. In this documented case there were three wall constraints: a ceiling beam with three columns, a 78.8 × 17.6 cm niche, a stair pitch 30 cm deep at a 45° cut. Each fold was solved architecturally, not concealed with filler panels. A cut list to the in-house CNC mill replaces the module grid — no standard cabinet, no filler strip.
From 3D measurement to finished installation typically 12 to 16 weeks. About 4 weeks for planning and order confirmation, 6 to 10 weeks for production (CNC mill, front fabrication, appliance delivery), and 1 to 2 weeks for installation and final acceptance. Renovations with drywall or screed work extend the timeline accordingly.
Modular kitchens come in three or four standard widths. Where the room deviates from the module grid, 5 to 25 cm filler panels are inserted. Custom-built kitchens are cut to the millimetre from measurement data — 3 to 5 mm air gap to the wall, no fillers, no visible jumps at folds. More on this in the guide The Five Most Expensive Mistakes When Buying a Kitchen and in the detailed FAQ section.
If the answer was always "only with a filler", a second conversation is worthwhile. With me, the folds are measured before planning, not concealed during installation.
Beams, service shafts, stairs, sloping walls — when these are honestly measured before the first plan, they are no longer a problem. They become a condition the kitchen takes on.
The free initial consultation (60 minutes, by video) is the next step. We walk through your room, I give you a realistic assessment — honestly, with no sales pressure.
Your next step
Book the consultation —
60 minutes, free, by video.
The architect's planning work worth 5,000 € is already included in your first offer.
Book the consultationIf your project is a renovation — or simply a room that wasn't built to a module grid — that's exactly the kind of project I founded for.
Rusi Kolev
Architect (AKH) · Real-Estate Economist (ebs)
Kolev Architektenküchen · kolev-kuechen.de